


By: Kathy Smith
Source: Mercola.com
After the age of 30, we all lose one-quarter pound of muscle mass each year if we aren’t strength training.
With less muscle, our metabolism slows and we are more likely to gain fat.
Remember while muscle is metabolically active (each pound of muscle can burn 35 to 50 calories a day), stored fat is not active so it burns far fewer calories.
The more muscle you have, the more calories you burn 24/7, regardless of what you are doing.
There are important differences between strength (or weight) training and aerobic exercise.
Both types of exercises burn calories and build muscle mass but at very different rates.
- Aerobic exercise, which refers mainly to cardio work that raises your heart rate for an extended period, burns fat and glucose during exercise.
- Strength (or weight) training utilizes fat and glucose for hours (and sometimes days) after exercising, so your metabolism stays slightly elevated for a longer period of time following a strength training session than after an aerobic workout.This is called the afterburn, which is fueled mostly by fat cells. Your body is working hard to re-oxygenate your blood and restore circulatory hormones.
This state of elevated oxygen use means a state of elevated calorie burning. How long the afterburn lasts can vary from a few hours to days, depending on the type of exercise you choose, its intensity, and how your body responds to the exercise.
The Ideal Workout
Your optimal workout, then, should include both strength and cardio training. “Matrix” is the name for my innovative system of exercise moves that employ a three-dimensional space. By performing a series of fluid motions in all directions—such as forward/back, side to side, and rotational—you simultaneously engage multiple muscles, along with joints, ligaments, and tendons, so that your body works as a unit.
The Matrix is one of the most efficient ways to tone the body quickly and completely. It brings back definition to waistlines, sculpts arms and legs, lifts butts, tightens thighs, and more. It is an incredibly powerful method of physical conditioning that results in a body that is longer, leaner, lighter, and most important, able to handle the physical rigors of everyday life.
The Matrix is based on functional training, which was developed by world-renowned physical therapists and professionals who specialize in high-performance exercise physiology and kinesiology. Instead of training one muscle at a time, which used to be the fashion, the Matrix follows the “integration” method of physical training. For example, one Matrix move is called the Chop, and it entails bending, twisting, lifting, reaching, squatting, lunging, and extending, all in one sequence of integrated movements.
It is not that there is anything wrong with isolation muscles and training them as you would in, say, a bicep curl.
But there are limitations with that kind of training. You are not getting the improved function, balance, flexibility, and coordination that come only when you treat the body like an integrated whole.
By contrast integrated movement is natural movement. In daily life muscles work together. When you get on an airplane, for example, you must bend, twist, and stretch in the narrow aisle to hoist your luggage and place it overhead. That twisting, bending, and placing is an example of the compound, integrated movements that occur every day at the grocery store, when taking out the trash, or when putting the kids in the car. The Matrix is a holistic style of training that ultimately protects you against the aches, pains, and risk of injury that accompany age.
Moreover because it draws upon how we move naturally in everyday life, it gives the body what it needs to respond more quickly to signals from the brain, optimize coordination and balance, and gain maximum agility.
The Workouts
Here are a few of my Matrix Method workouts. As you go through them, notice how they engage multiple parts of body. The bending, twisting, and stretching of these moves help strengthen your entire body while giving you a great workout. If you would like to check out all of the workouts, plus much, much more, they are all located in my book, Feed Muscle, Shrink Fat.
Lower Body Workout
1. STEP TOUCH WITH CROSS-BACK LEG AND OPPOSITION ARMS
MOVE: To warm up your body, step side to side tapping your leg diagonally behind you while reaching the opposite arm to the front. Gradually make the movement bigger.
TIPS
- Stand erect, shoulders back, chest up, head lifted tall. Pull your abs in.
- Stretch your arm front and your leg back in opposition, feeling the mild stretch through the torso.
- This move can be done for a longer period of time. It is an effective cardio move that can increase heart rate to your target zone. Adding propulsion can increase the intensity of the move. Propulsion can be added by simply leaping out of the tap into the next step.
2. SQUAT WITH SIDE LIFT AND OVERHEAD PRESS
TARGETS: Quadriceps, hamstrings, gluteals, gluteus medius, shoulders and arms
SETUP: Feet hip width apart, check Postural Points. Hold light weights.
MOVE: Hold the weights at shoulder level, elbows bent. Inhale as you drive your hips back lowering them down. As you exhale and return to standing, lift your right leg, squeezing the muscles around the hip, pressing the weight held by your left arm overhead. Return to the squat, inhaling and sitting back into your heels, chest up. As you return to standing, squeeze the gluteus lifting your left leg, and press the right hand and weight overhead. Repeat a total of 30 times (15 on the right and 15 on the left).
FOCUS: Squats should always be performed in “neutral spine.” This means that the spine will be in the same alignment during the squat as you have when you are standing in perfect posture. As you squat, do not let your ribs collapse down, rounding your spine. Do not let your ribs flare open either, which will cause too much arching of the low back. If done properly, your knees will not drive forward over your toes as you go down, but will be about as far forward as your mid foot.
COMMENTS: If your arms fatigue, finish the leg reps without the overhead press. Similarly, if your legs fatigue and you are able to continue the overhead press with the arms, then do so.
SAFETY AND FORM POINTS:
- Your weight should never shift into your toes. Sit back into your heels.
- Keep your chest up
- As your leg lifts squeeze your glute. Rather than focus on lifting your leg high, instead try to increase the squeeze aiming the leg long and low. This will help to avoid hiking up your hip.
- As you press the weight overhead, your elbow should look straight, but feel bent.
3. STEP BACK LUNGE WITH CROSS CHOP
TARGETS: Buttocks, thighs, arms, shoulder and core.
SETUP: Check postural points. Feet hip width apart, standing tall. Hold light weights, a small towel, or do the exercise with no added weight.
MOVE: As you inhale, step backwards far enough with the right foot so that as you dip down into the lunge, your left knee is over your left ankle. As you step back with the right foot lift your arms overhead, but over the left shoulder. Look for and notice the stretch in your left shoulder, your left ribs, and you may even feel a stretch in your right quadriceps (the front of your right hip and thigh). Exhale, bringing the right in toward your chest on the left side, moving the arms to your right hipbones. Do 10 stepping back with your right leg, and 10 stepping back with your left leg.
FOCUS: When you step back and land on the right leg, your torso should be completely upright. Do not lean forward or backward. Throughout the exercise your abdominals need to be active so that your low back does not arch as you bring the weights overhead. Be aware of the ribcage popping open—this allows the low back to buckle in, breaking form.
COMMENTS: This exercise can be performed either holding light weights or a small towel, having your hands about 12″-20″ apart. The towel option is a great beginner variation, but more advanced people might also like it since it allows you to work the rotation of the move effectively. If balance is a problem, rather than bringing your knee into your chest balancing on one foot as the arms chop toward your hip; instead bring your foot in, next to your other foot in a light tap.
SAFETY AND FORM POINTS:
- Step back far enough into the lunge so that the front knee is directly over the front ankle. Keep this alignment in the deepest part of the lunge.
- When your arms reach diagonally overhead, do not collapse your core muscles, resulting in arching of the low back.
4. CALF RAISES WITH SIDE LATERAL LIFT
TARGETS: Calves (gastrocnemius, soleus), shoulders (medial deltoid).
SETUP: Stand tall with shoulders pulled back and down, feet hip width apart. Check Postural Points. Hold medium to light weights by your side.
MOVE: As you exhale, lift up onto your toes, lifting the weights laterally to shoulder height. When the weights get to shoulder height, pull your shoulder blades together, stabilizing your upper back and then lower the weights slowly as you go back down from your toes to standing. Do 20 repetitions. If your arms fatigue, continue the calf raises without lifting your arms, or substitute an easier move like a bicep curl.
FOCUS: Be sure to keep the upper body in perfect posture as you lift and lower the weight. Keep your shoulders back and your chest lifted.
COMMENTS: As you get stronger, the calf raises can be performed on a surface like a stair for a bigger range of motion. Place the ball of the foot on the stair, and drop your heels as low as you comfortably can, then lift onto the toes. If the lateral raises bother your shoulders, try turning your palms slightly upward. For some people that slight rotation relieves any shoulder stress.
SAFETY AND FORM POINTS:
- Keep your shoulders back and chest up. Always work on posture before performing the move.
- Choose a weight that you can move slowly with control.
5. LUNGE DIP WITH BICEP CURL
 TARGETS: Hips and thighs (quadriceps, hamstrings, gluteals), biceps and shoulder.
SETUP: Start with feet in parallel, hip distance apart, shoulders back, abs in, holding a pair of medium to heavy weights.
MOVE: Step back with your left leg into a lunge. Keeping your back straight, dip straight down and up. Your front right knee can bend to a 90-degree angle, which will bring your hips down about as low as your knee. Do not go deeper than that. As you dip down, bend your elbows, performing a bicep curl. Do 15 reps with the right leg in front. Repeat 15 reps with your left leg in front.

FOCUS: If you dip low enough (close to a ninety-degree bend of the knee) then you will feel this exercise in the glutes and the hamstrings as well as the quadriceps. Keep your elbows directly under your shoulder in the bicep curl (do not let them drift backwards). Squeeze the biceps as you finish the move, and then lower the weights down with control.
COMMENTS: For greater challenge, have your front foot on an unstable surface such as a BOSU or a balance disc.
SAFETY AND FORM POINTS:
- Step back far enough into the lunge so that the front knee stays over the ankle as you dip down. The front knee should not drift forward over your toes.
- Keep your shoulders over your hips—do not lean forward.
- Do not let your back round out—keep your spine tall and lifted.
- As you bicep curl do not let your elbows drift backward. Keep your elbows directly underneath your shoulders.
6. PENNY IN THE POCKET WITH A ONE-ARM ROW
TARGETS: Gluteals, hamstrings, shoulder, upper back

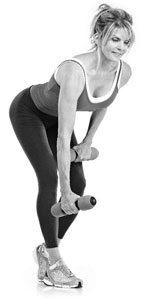 MOVE: Using your left arm, pretend there is a penny on the floor that you need to bend over to pick up, and then put it in your pocket. Do 15 with the right leg forward then 15 with the left leg forward.
FOCUS: Your spine should not flex or extend in this move. In other words, keep the spine straight, in perfect postural alignment. Your ribs should not collapse down effectively shrugging your upper body. Instead, hinge at the hips to pick up the penny. As you reach down for the penny, you will probably feel a little tug or stretch on the right hamstring near your glute.
COMMENTS: Beginners should try this move without a weight. Slowly incorporate a light weight.
SAFETY AND FORM POINTS:
- Keep your spine straight. Do not curve your back by rounding it.
- Do not shrug your shoulders forward or let them creep up, even when reaching for the penny.
- Keep your weight on your front foot. Try and either very lightly tap the floor with your back foot, or hover it off the floor.
- Pull in your abs.
7. ONE LEGGED SQUATTING DEAD LIFT WITH BACK ROWS
TARGETS: Gluteals, quadriceps, hamstrings, upper back
SETUP: Check Postural Points. Put your right foot in front of your left by about 12 inches. Your right knee will be almost completely straight, but will feel bent and soft. Your left foot will have very little weight on it (similar to “Penny in the Pocket). Keep your spine very straight and hinge over at the hips. If you do this properly, your back will have the same amount of curve that it had when you were standing up straight.
Your ribs will not sink down into your abdominals, but will stay lifted. Your chest will stay lifted. Your shoulders will stay back, not shrug forward. You should be able to feel a slight tug or stretch in your right hamstring and glute area. The position you just created is effectively a one-legged dead lift. Hold light to medium weights.
MOVE: With your right leg forward, staying in your dead lift, start to lower your hips toward the floor by bending the right knee more, KEEPING YOUR BODY WEIGHT IN YOUR RIGHT HEEL. Do not let your body weight drift into your right toes. Your body weight stays in your right heel in the lower phase of the exercise when your hips are lower, as well as when the hips return to the starting position.
After the hips return to the starting position, perform a two-armed row by pulling the weights up with your elbows just brushing your waist. Squeeze the upper back at the upper phase of the exercise, and then lower the weights with control. Begin the next repetition. Do 12-15 with the right leg forward, then 12-15 with the left leg forward.
FOCUS: The further down you bend your knee and drop your hips, the more you will activate the hamstrings and gluteus. As you get stronger, try and do this exercise with no weight on the back foot. When you perform the upper back row, finish the move by squeezing the shoulder blades together.
COMMENTS: Beginners may want to begin this exercise with no weights and do the back rows with weights as a separate exercise.
SAFETY AND FORM POINTS:
- Keep your body weight in the front heel—do not let body weight drift into the front toes at all.
- Do not round your spine at all. Keep your back straight
- Keep your chest lifted through all phases of the exercise.
- Try not to put body weight into the back foot.
8. BRIDGE WITH WEIGHTS ON HIPS
TARGETS: Gluteals, hamstrings, low back muscles, core.
SETUP: Lie on your back with knees bent, feet directly underneath knees. Place a pair of light to medium weights on the hips, right at the crease between the pelvis and the upper leg. Lift your hips off the floor, performing a bridge. Make sure when you do the bridge, that your ribs are not flaring open. Instead, activate your abdominals by slightly closing the ribs up.
Make sure that your hips have gone as high as you can. If you have your rib cage closed, your abdominals pulled in tight and your hips pressed up using your gluteus, you may feel a stretch over the front of the hips and thighs.
MOVE: Lift your right leg off the floor and put the right leg over your hips in the air. Keeping the right leg over the hips, lift and lower the hips 15 times. Then move the right leg down until your right knee is level with your left knee. Lift and lower the hips another 15 times. On this second position, you should feel more activation of the hamstrings, while you should feel more intensity in the glutes in the first position.
You will feel the intensity in the left glute and hamstring when your right foot is in the air. Then complete the exercise with the left leg in the air, 15 repetitions with your left foot over your hips, and 15 repetitions with your left knee next to your right knee.
FOCUS: It is very common for people doing bridging exercises to flare out their ribs, which can create some compression in the lower back. When you use your glutes you will activate the lower back muscles. The activation is good, but activation with compression may bother your back. Make sure that your ribs are not flared out. Knit the ribs in and down to avoid this collapse in form.
COMMENTS: Beginners could try this exercise without any weight on the hips with both feet on the floor (level 1). As you get stronger, add weight on the hips, both feet on the floor (level 2). In level 3 you will remove the weights and start the one-legged option. The final progression (level 4) is to have the weights on the hips, and perform the exercise with one leg at a time.
SAFETY AND FORM POINTS:
- When you bridge, your hips will go up so that your thighs, hips, and ribs are in a straight line (don’t have your hips drooping down).
- Check that your ribs are knit together–not flaring out.
- If the exercise is too difficult, try the progression under “Comments.”
- Complete each repetition so that the hips return to the bridge position (straight line between the thighs, hips, and ribs).
9. LUNGE TO 9:00 AND 3:00 REACHING FORWARD
TARGETS: Quadriceps, hamstrings, gluteals, upper back, shoulder, arms, core
SETUP: Check Postural Points. Start with feet in parallel, hip distance apart, holding a light weight.
MOVE: Take a wide step to the right. Step out far enough that when you drop your hips into the lunge bending your knee, your right knee should be over your anklebone, not jutting over your right toes. As you lunge to the right, press the weight in your left hand across your body at shoulder height. As you lunge to the left, press the weight in your right hand across your body at shoulder height. Do 8 repetitions side-to-side. Then do 8 repetitions staying on the right side by lunging right (left arm pressing the weight) and returning to the center, repeating the lunge 8 times. Repeat for 8 repetitions lunging left, using your right arm to press the weight across your body.
FOCUS: As you lunge, make sure that you have a wide enough stance. Your knees should stay over your ankle when you are in the lowest part of the lunge. Keep your body weight in your heels. Your weight should not drift into your toes when lunging. When you press the weight across your body, keep your shoulders back and your chest open. Do not let your shoulders shrug or posture collapse.
COMMENTS: Beginners may want to begin this exercise with no weights in the lunge, and do the arm movement separately.
SAFETY AND FORM POINTS:
- Make sure your stance is wide enough. Knees should never jut over the foot in a lunge.
- As you drop your hips into the lunge, keep your weight in your heel. Do not let your weight shift into your toes.
- Keep your chest open and your shoulders down. Do not shrug or collapse your posture.
- Keep the exercise under control.
10. SQUAT WITH ROTATING TWIST
TARGETS: Quadriceps, hamstrings, gluteals, abdominal muscles including obliques, shoulders and arms.
SETUP: Check Postural Points. Start with feet in parallel hip distance apart. Hold light weights with your arms at your sides.
MOVE: Drive your hips back, bending your knees, until your knees are bent to about a ninety-degree angle. Sit back into your heels. Keep your chest lifted and your spinal muscles active—do not let the spine collapse or the shoulders shrug forward. As you go into the squat, place the weights near your right ankle.
As you go up, keep the left foot and hip in parallel (do not let it pivot or move sideways) but pivot on the right toe. As you pivot on the right toe, squeeze the right glute hard, turning your hips to face the left, and bring the weights overhead toward your left. Do 12-15 with your right toe pivoting, then 12-15 with your left toe pivoting.
FOCUS: When you squat, focus on keeping your chest up and your spine straight. As you go up into the pivot, feel your hips turn and squeeze your glutes correspondingly.
COMMENTS: Try and get the squat to be deep enough that your knees are at a ninety-degree angle to get the glutes and hamstrings to work more. To keep your knees in the proper position, make sure that you sit back into your heels when you do the squat, and make sure your back stays straight. Do not collapse your ribcage, rounding your spine.
SAFETY AND FORM POINTS:
- Chest up—do not collapse your spine as you squat. No rounding or shrugging of the shoulders or back.
- Sit back into your heels in the squat
- As you pivot and twist, squeeze your glute.
- As the weights go overhead make sure that you remain under control. Do not let your back arch or round, but keep your core braced.
Upper Body Workout
1. WARM UP MOVE: RHYMIC LUNGE WITH BACKSTROKE
TARGETS: Legs, glutes, core, arms and shoulders.
SETUP: Feet in a wide stance. Check Postural Points.
MOVE: Lean your body weight side to side, keeping your weight toward your heels and mid-foot (do not let your weight go forward into your toes. If your feet are the proper distance, your knees should be directly over your ankles in the deepest part of the lunge. When you lunge to the right, backstroke your arm feeling your shoulder blade initiating the move. Lead with your fifth finger (pinky) as you reach back. As you lunge left, backstroke the left arm.
FOCUS: Feel the ribs open up and the shoulders and shoulder blades move as you make the move bigger and bigger. Try and deepen the lunge as you warm up. Do about 30 total repetitions (15 to the right and 15 to the left).
COMMENTS: Make sure your feet are wide enough so that the lunge can really open up and work your legs.
SAFETY AND FORM POINTS:
- Feet wide. Do not let your knees jut over your toes in the lunge.
- Exaggerate the rib cage as you backstroke the arms to warm the core.
- As you exaggerate the rib cage continue to stay under control. Do not let your body collapse through the core, which could be uncomfortable for the low back.
2. SIDE LATERAL DELTOID LIFTS WITH LEG IN ROTATIONAL BALANCE
TARGETS: Medial deltoid (shoulder), quadriceps, abdominals including obliques.
SETUP: Start by standing with feet in parallel. Check Postural Points. Hold light weights.
MOVE: Lift your left leg crossing it over your right leg, pointing it toward the right. Look toward your left to counter-rotate your torso—lift your spine long as you twist. Start with the weights at your side, lift them to shoulder height, and squeeze the shoulder blades together as the weights get to the height of your shoulders. Lower the weights down keeping the shoulder blades active. Do 15 repetitions bringing the weight up, pinching the shoulder blades together, and then lowering down with control.
Repeat standing on your left leg, pointing your right leg toward the left, counter-rotating the torso to the right. Do 15 repetitions.
FOCUS: Keep your shoulders open. Do not shrug your shoulders as you lift the weights.
COMMENTS: If you feel any discomfort in your shoulders, rather than holding the weights palm down, try opening the palms slightly. If the balance aspect is difficult for you, try tapping your toe on the floor rather than hovering it in the air. As you get more confident, lift the foot slightly off the floor, ready to tap it if you start to lose your balance.
SAFETY AND FORM POINTS:
- Keep your shoulders down as you work them. Do not let them creep up under your ears during the exercise.
- Pull the shoulder blades together throughout the exercise, keeping your chest open and maintaining good posture.
- Pull your navel toward the spine throughout the exercise.
3. PLIE TO 4:00 AND 8:00 WITH OVERHEAD PRESS
TARGETS: Quadriceps, hamstrings, inner thigh, outer thigh, gluteals, shoulders, arms and core.
SETUP: Check Postural Points. Hold light to medium weights. Check the width of your feet by performing a plié without stepping. When you bend your knees, drop your hips about as low as your knees. If width of the feet is correct, your knees will be over your ankle, not jutting over your toes.
MOVE: Imagine that you are standing in the middle of a clock. Straight in front of you is 12:00 and behind you is 6:00. Step with your right foot, performing a plié, to your right to the 4:00 mark. As you lower down into the plié, press the weights overhead. Bring the weights back to shoulder level as you return to standing in the middle of your “clock.” Alternate stepping to “4:00” and “8:00” 12-15 times (24-30 repetitions total).
FOCUS: As the weights press overhead, do not let your back arch or let your core collapse. Keep your spine straight and your abs active. Pull the navel to the spine. Check that your ribs do not flare out, but stay knit together.
COMMENTS: If your arms fatigue, continue to do the plies without the arms, or do half the reps with your arms by doing one arm per plié (for example, as you step to the right lift just the right arm, and as you step left, lift the left one. Beginners should take the plié as low as they can go without breaking form. If your body tips or leans forward, do not go as low. Maintain upright posture throughout the exercise.
SAFETY AND FORM POINTS:
- Keep your elbows soft as you press the weight overhead. Your elbow will look straight but feel bent.
- Work up to dropping the hips as low as the knee in your plié (your thighs will be parallel to the floor). Your hips should not go deeper than that.
- Step wide enough that your knees are over the ankle in the deepest part of the plié. The knees should not jut over the toes.
- Work on tucking your hips under, so as you go into the plié your body stays very upright.
- Pull your shoulders back and keep your chest up.
- Pull your belly button/abdominals in tight.
4. HACK SQUAT WEITH BICEP CURLS
TARGETS: Quadriceps, hamstrings, gluteals, biceps
SETUP: Start with feet hip distance apart. Hold medium to heavy weights.
MOVE: Lift your left foot and then drive the heel out, placing it on the floor about 12-18 inches in front of your right foot (if you measured from your left toes to your right toes). The amount of distance between your feet will vary depending on your height, leg length, and the flexibility of your hamstrings). Even though one foot is in front of the other, maintain the distance between the inside of your feet to be about hip distance. Sit back into the Hack Squat by driving your hips behind you, keeping your chest up.
You should feel a stretch in the left hamstring. If you have your left toes up enough, you will also feel a stretch in the left calf. Once you feel the stretch, you know you have gone deep enough into the hack squat. As you come out of the squat, do a bicep curl. When you bend your elbows in the bicep curl, keep your elbows next to your waist. Do not let the elbows drift back behind you. Keep your chest up throughout the exercise. Really sit back into the squat, keeping your weight in your right heel. Do not let your body weight shift into your right toes.
Do 12-15 Hack Squats with the left foot forward (weight stays in your right heel, and you will feel the exercise in your right glute, hamstring, and quad), and then do 12-15 Hack Squats with the right foot forward, keeping your weight in your left heel.
FOCUS: If you slump into poor posture, you will not feel this exercise properly. Keep your chest up and drive your hips back into the hamstring stretch.
COMMENTS: For variety, you could reverse this exercise so that you perform the bicep curl as you go down into the hack squat. Beginners could start with the hack squat only using no weight, and do the bicep curls as a separate exercise, simply standing up with good posture.
SAFETY AND FORM POINTS:
- Keep the shoulders open—do not let your shoulders slump forward.
- Keep your chest up—do not let your chest collapse down.
- Really sit back into the back heel—do not let weight drift into your back toes.
- As you go down into the squat be aware of finding the stretch in the front leg. That is the stopping point (the end of the range of motion).
- Pull the navel toward the spine
5. TRICEP KICKBACKS AND POSTERIOR DELTOID LIFT IN A SQUAT
TARGETS: Triceps, posterior deltoids (the back of the shoulder) quadriceps, gluteals, hamstrings and core.
SETUP: Hold light to medium weights. With feet hip distance, bend your knees, driving your hips back into a squat. Your chest should stay up, keeping your spine straight. Your knees will be over mid foot, but should not jut over the toes.
MOVE: Tuck your elbows into your waist, but aim them high toward the ceiling. As you squat, straighten your elbows, using your triceps. Then lift the straight arm, which will work your posterior deltoid (back of the shoulder). As you bend your elbows back in, return to standing. Try and coordinate the move so that you squat and straighten the elbows at the same time, keep your legs quiet in the squat as you lift the straight arm, then return to standing again. Do 15 repetitions.
FOCUS: Check your Postural Points. Keep your chest lifted so that your spine does not round. As you bend and straighten the elbows, be aware of the shoulder posture. Do not let your shoulders shrug forward. Open your chest instead. Make sure that you sit back into your heels in the squat. Your body weight should not shift forward into your toes.
COMMENTS: Stay under control with the arm movement. As you straighten the elbow, you should be able to stick in the move for a split second—the weights should not swing through space. The same thing applies when you lift the straight arm—the weights should not swing—you should be able to stop momentum and stick in the move for a second.
SAFETY AND FORM POINTS:
- In the squat, sit back into your heels.
- Control the weights. Do not allow them to have momentum. Do not swing them.
- Aim your elbows high in the triceps press.
- Keep your shoulders open—do not allow them to slump forward.
- Keep your chest up.
- Pull your navel toward you spine
6. BACK FLYES WITH BALANCE
TARGETS: Upper back postural muscles, quadriceps, gluteals, and hamstrings.
SETUP: Check Postural Points. Hold light weights. Start with your right foot on the floor with a small tap-balance with the left foot. Notice your alignment. Chest up, abdominals engaged, shoulders back, glutes active. Pivoting on your right foot through your right hip, move your WHOLE BODY from your left toes to the tip if your head as ONE UNIT until your body is parallel to the floor.
If you do this correctly you will continue to be one straight unit from the top of the head through the toes on the left foot, and you will probably feel a little stretch in the right glute/high hamstring area. Hold light weights.
MOVE: Hold this balance move and do 10-15 back flyes with your right foot on the floor. With your hands directly under your body, palms facing each other, lift the weights with a slight bend in the elbow. As you finish the move, squeeze the shoulder blades together. Repeat with the left foot/leg as the balance leg and do another 10-15 back flyes.
FOCUS: The stretch that you feel in the standing leg will begin to turn into fatigue as you continue to hold the position of the exercise. You may also feel some fatigue in the lifted leg. Try and complete every back fly with a squeeze of the shoulder blades toward the spine.
COMMENTS: If you are very tight in the hamstrings, you may not be able to get fully parallel to the floor. Hinge down into the exercise until you feel the stretch/tug at the glute/high hamstring area and work from there. If the light weights are too difficult, or you find you break form too quickly, do the exercise without weights and just use your body weight. If balance is difficult, work up to the exercise by having your foot tap the floor with very little of your body weight.
As you progress hover the foot off the floor. When you feel more confident and steady, start to lift the leg higher for longer periods of time.
SAFETY AND FORM POINTS:
- Keep your chest lifted as you balance.
- Do not collapse your rib cage or let your low back buckle in.
- If balance is difficult for you, tap your foot on the floor.
- Lift the weights with control. Do not swing. The move can also be done without weights.
- Keep your abdominals pulled up and in.
7. CHEST FLYES AND PRESSES ON THE BALL
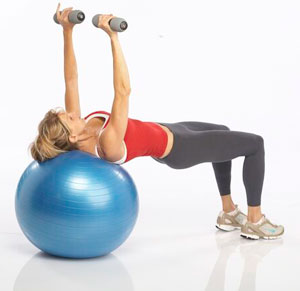
TARGETS: Chest muscles, arms, upper back, gluteals, core.
SETUP: Sit on the ball holding your medium weights and roll out until your shoulder blades touch the ball. Squeeze your glutes, bridging your hips up toward the ceiling. Check that your ribs are not flared out which will compress the low back. Have your abdominals pulled in and your ribs knit together.
Feet open is the easiest position, feet hip distance is a little harder, feet and knees together is even harder, and doing this exercise in a one-foot balance is the most difficult. If you are doing the bridge properly you will probably feel your low back muscles working alongside with the glutes. Hold a medium to heavy weight.
MOVE: Do 12-15 chest flyes. Your arms will have a slight bend in the elbows, weights will be over your chest with your hands turned Palm-to-Palm. As the weight goes down into the fly, squeeze your shoulder blades together to avoid the weight from just resting in the shoulder socket. Then do 12-15 chest presses.
To transition from a chest fly to a chest press, turn the weights from Palm-to-Palm to End-to-End. Widen your weights over your chest so there is about 12-18 inches between the weights. Bring the weights down, engaging the shoulder blades, and then press them back up.
FOCUS: When doing the chest flies and presses, be aware of your core muscles and positioning on the ball. Your ribs should not be flaring out, but funneled in and down. Your glutes will be active pressing your hips up. Your abs will be active knitting the ribs together. The weight should never drop down into the joint of the shoulder socket and rest there—the muscles should always be active.
COMMENTS: Chest presses are an easier move so it is usually best to do flyes first, and presses afterwards. If you do not have a stability ball, use something that will lift you a few inches off the floor like a large dense pillow.
SAFETY AND FORM POINTS:
- Knit your ribs together and pull the navel toward the spine, sinking the abs.
- Use your glutes to press your hips up. Don’t let the hips droop.
- Stay under control when doing flies and presses. Do not let your weights sink into your shoulder socket. Keep the muscles active.
- Squeeze the shoulder blades together to anchor the upper back when the weights are in the lowest position.
8. TRICEP EXTENSIONS ON THE BALL
TARGETS: Triceps, chest and upper back, glutes, core.
SETUP: Your positioning on the ball is the same as in chest flies and presses—the wider your feet are from each other the easier—closer is harder. Have your glutes active in a bridge. Hold medium weights.
MOVE: Bring the weights over your head until the weights just barely tap the ball. With the weights tapping the ball, notice where your elbows are in space over your head. They will probably be right over your forehead. Try and keep your elbows there as you straighten and bend your elbows using your triceps. When your bend your elbows in each repetition, tap the ball. Do 12-15 repetitions.
FOCUS: When your elbows straighten, squeeze the muscle trying to hold the position a split second. Be aware of your core collapsing during the move. Your ribs should be knit down, not flared out. Your navel should be sunk down toward your spine. Your glutes will be active, driving your hips up away from the floor.
COMMENTS: If your shoulders are tight, you may not be able to tap the ball. Go with the range of motion that is comfortable for your body.
SAFETY AND FORM POINTS:
- Knit the ribs, keeping the core muscles active.
- Do not let your back arch. Tuck your pelvis slightly and keep the abdominals active.
- Keep your elbows over your forehead. Do not let them move as you do the presses.
9. PUSH UPS
TARGETS: Chest and upper back, core and lower back, legs, arms and shoulders.
SETUP: Start on a plank on feet and hands. Lift your right leg and wrap it around your left leg, squeezing your glutes, inner thighs, and pelvic floor muscles. Keep your abs lifted up toward your spine. If this is too difficult, drop your knees to the floor, modifying the push up. Have your hands slightly pointed inward.
MOVE: Lower yourself down toward the floor trying to achieve about a ninety-degree bend in the elbows. If you can go down from your toes, but cannot push back up, then lower your knees to the floor, and push back up from the modified position. Exhale as you press back up.
FOCUS: If your core is weak, you may need to move to a modified push up, since the pushup from your toes is more difficult not only for your chest, arms and back, but also your core. If your back is collapsing, if your rib cage cannot stay knit together, if you feel any discomfort in your low back, modify the push up by dropping down to your knees.
COMMENTS: Pushups are almost the perfect exercise, since they work so much of the body in just one exercise. They are difficult! Work on maintaining your core positioning first. As the core gets stronger, the pushups will get easier too.
SAFETY AND FORM POINTS:
- Keep your low back and buttocks suspended—do not let your low back sag toward the floor.
- Keep your abdominals contracted. Knitting your rib cage together will keep you from flaring out the ribs. Flaring open the ribs will cause the low back to sag down.
- Try to bend your elbows to a ninety-degree angle.
- Modify the pushups if your core collapses—even if your chest can keep going.
10. ROLLING PLANK T-STANDS ON FOREARMS
TARGETS: Chest, back, shoulders, arms, legs, core.
SETUP: Start in a modified push-up position with your forearms and feet on the floor. Have your feet about 12 inches apart. Pull the navel toward the spine and keep it there as you breathe in and out, for about 15 seconds.
MOVE: Roll to your right forearm, turning your feet both onto their sides. Your left arm will be in the air. Squeeze the shoulder blades together, opening your chest. Hold this for 15 seconds. Then roll to the left forearm, turning your feet as you go. Your right arm will be in the air. Squeeze the shoulder blades together again and open the chest. Hold this also for 15 seconds.
FOCUS: As you hold the plank, make sure that you pull the navel in—up and away from the floor. When you are on just one forearm, make sure that your hips do not sink down, but your body stays in a straight plank, even though you are sideways.
COMMENTS: If you do this move with your feet close together, as you roll to the side you can stack your feet. Advanced option from here: lift the top leg. This move can also be done from your hands rather than your forearms. Start in a plank on hands and feet. As you roll to the side you can incorporate the other options such as stacking feet and lifting the top leg.
SAFETY AND FORM POINTS:
- Abdominals knit together, navel toward spine.
- Hips stay lifted when rolling to a side.
- Pull the shoulder blades together when you lift one arm off the floor.
- As you do these moves, try and brace your body to stay stiff in the position as you change where you are in space.
Core Workout
1. CRUNCHES ON THE BALL
TARGETS: Abdominal Muscles (Rectus and Transverse).
SETUP: Start by sitting on the ball. Roll out by walking your feet away from the ball. Your hips will descend slightly on the ball. Place your hands behind your head, supporting the head and neck. If you have your feet wide it is easier than if you move them close together. Touching feet (toes and heels) and knees together is even harder. Lifting one leg off the floor while doing the exercise (very advanced) is the toughest version.
MOVE: Lift your shoulders off the ball by knitting your ribs together and sliding your ribs down toward the top of your pelvis. Finish the move by giving the ribs one last little squeeze in that position. As you go down, do not release the ribs, but slide them back toward their original position with control. During all phases of the movement, pull your belly button toward your spine.
FOCUS: The movement of the ribs is what makes the exercise so effective. Make sure that you squeeze the ribs toward the pelvis to get as much out of the repetition that you can, and as you go down, go with control, pushing through space. You should not collapse your ribcage, flaring the ribs out, as you go back down to the ball.
COMMENTS: If your hips are higher toward the top of the ball, the move is harder. If your hips are closer to the floor, the move is easier. You could use the move as a warm up move, progressively moving the hips a little bit higher toward the top of the ball as your core warms up. For more work into the oblique muscles, try pressing side-to-side, angling the body and shoulder to one side then the other as you lift and lower down. If you do not have a ball, do crunches on the floor or a mat.
SAFETY AND FORM POINTS
- Knit the ribs together
- Squeeze the ribcage down toward the top of the pelvis
- Pull the navel toward the spine
- Hips higher on the ball is harder; lower on the ball is easier
- Stay under control—do not collapse the ribs, flaring them out when you go down.
- Feet closer together is a harder move; feet wider apart is an easier move.
2. TUCKS IN PLANK, OPTION SWIVEL UNDER
TARGETS: Arms and shoulders, abdominals, glutes and legs.
SETUP: Go into a plank with hands and feet on the floor. Lift your abdominals away from the floor by pulling them toward your spine. Squeeze your glutes, inner thighs and pelvic floor muscles to help brace your core.
MOVE: Pull the right knee in toward your chest. As you do your spine will flex. Try not to let your hips pop up, but keep them low in the plank position. If your hips pop up, you will notice that your knee will be far above the floor as you tuck, rather than being fairly close to the floor as it pulls in. Lean into your arms as you tuck, which will bring the knee even closer to the arms. Repeat with the left knee, alternating right and left for up to a minute.
For variety, try doing 30 seconds with your knees tucking into your chest, and 30 seconds bringing the knee to the opposite elbow. If you decide to try the swivel, as you pull the right knee into the chest, swivel the left foot, bringing your right knee under you to your left. Tuck your right tucked knee as high toward the ceiling as you can. Finish by re-tucking the knee to your chest, and then place it back on the floor, re-bracing your core. Repeat with the left knee tucked and swiveled under. Work up to 5 or 10 of the swivels.
FOCUS: If your knees are not close to your elbow, then your hips are too high. Lean into your arms and you will feel this exercise much more in your core. When your knee gets close to your chest or elbow, squeeze it into the contraction a little deeper. Do not swing the knee in and out.
COMMENTS: A plank is basically a military pushup position—hands under shoulders, toes on the floor, body in a straight “plank”. Hips should not be higher than the rest of the body. The body should be in a straight line. BEGINNER OPTION: try this exercise on your forearms and knees. Pull the knee in as tight to your chest as you can, hold it there with a squeeze, and then replace the knee on the floor.
SAFETY AND FORM POINTS:
- Pull the navel toward the spine throughout the exercise
- Do not swing the knee toward your chest, but squeeze it in.
- Lean into your arms as the knee comes in toward your chest.
- When you swivel, squeeze the knee up in a tuck, do not swing it up.
- Beginners can work up to this exercise by first mastering the exercise on forearms and knees.
3. SQUAT WITH CROSS CHOP
TARGETS: Quadriceps, hamstrings, gluteals, abdominals (rectus, transverse, and obliques), latissimus dorsi, arms, shoulders.
SETUP: Check Postural Points. Stand with feet hip distance apart. Hold light to medium weights.
MOVE: Drive your hips back into a squat, keeping your chest up and your spine straight. Sit back into your heels. Your hips can go as low as ninety-degree bend in the knee, but should not go lower than that. As you return to standing, bring your right knee up toward your chest on the left side, bringing the weights toward the right hip. Stay under control—avoid the use of momentum. As you lift the knee, be aware of keeping the spine straight. You should not lean backward or collapse the spine or ribs by leaning forward. Do for one minute alternating right and left—about 30 total squat/chops.
FOCUS: The spine stays straight throughout the exercise.
COMMENTS: When performing the chop, check that your right and left knees cross over the same amount. If you notice that one has more flexibility than the other, work the tighter side a little harder working to equalize the flexibility between right and left. For variety you could do 12-15 squat/chops right, then 12-15 squat/chops left.
SAFETY AND FORM POINTS:
- When doing the squat, keep your chest up, sit back into your heels, and go to a ninety-degree bend of the knee (no more).
- When doing the chop, aim the weights for your hip. You can give this variety by having the chop higher or lower, or aiming slightly behind the hip.
- Keep your spine straight. Rotation of the spine is safest when the spine is tall and lifted, minimizing compression.
- Stay under control. Use a squeeze rather than momentum to access the movement.
4. DISCUS THROWER
TARGETS: Legs, hips, gluteals, abdominal muscles including obliques, arms, shoulders.
SETUP: Check Postural Points. Start with feet in parallel hip distance apart. Hold light weights with your arms at your sides.
MOVE: The set up for Discus Thrower is the same as Squat with Rotating Twist. Drive your hips back, bending your knees, until your knees are bent to about a ninety-degree angle. Sit back into your heels. Keep your chest lifted and your spinal muscles active—do not let the spine collapse or the shoulders shrug forward. As you go into the squat, place the weights near your right ankle. As you go up, keep the left foot and hip in parallel (do not let it pivot or move sideways) but pivot on the right toe.
As you pivot on the right toe, squeeze the right glute hard, turning your hips to face the left. As you do this sweep the weights in a fluid motion from your feet, up and out, until they are over your head on the left. Do 12-15 with your right toe pivoting, then 12-15 with your left toe pivoting.
FOCUS: When you squat, focus on keeping your chest up and your spine straight. As you go up into the pivot, feel your hips turn and squeeze your glutes correspondingly. Stay under control as you sweep the weights from your right ankle to your left side overhead.
COMMENTS: Try and get the squat to be deep enough that your knees are at a ninety-degree angle to get the glutes and hamstrings to work more. To keep your knees in the proper position, make sure that you sit back into your heels when you do the squat, and make sure your back stays straight. Do not collapse your ribcage, rounding your spine. This move also works well with a ball or a weighted ball like a medicine ball.
SAFETY AND FORM POINTS:
- Chest up—do not collapse your spine as you squat. No rounding or shrugging of the shoulders or back.
- Sit back into your heels in the squat
- As you pivot and twist, squeeze your glute.
- As the weights sweep overhead, make sure that you remain under control. Do not let your back arch or round, but keep your core braced.
5. BUMP
TARGETS: Abdominals and back, lateral side of torso, arms, shoulders, hips.
SETUP: Stand tall with feet together. Check Postural Points.
MOVE: Begin my letting your hips rock to the right, keeping your feet together. As you get your rhythm going, step out with the right foot, still bumping your hips out to the right. Progress by adding the right arm overhead as you step away with the leg. Repeat for 12-15 repetitions bumping to the right, and then repeat the move stepping out with the left foot.
FOCUS: As you bump to the side, focus on the muscles on the side of the torso. Make sure that you do not arch your back or slump your spine forward.
COMMENTS: After you are comfortable with the bump, try adding intensity by either holding a light weight, or swaying both arms overhead. Pay special attention to your low back, your form, and your posture as you progress in intensity.
SAFETY AND FORM POINTS:
- Check Postural Points throughout the move
- Keep your abs pulled in—do not let your back arch or slump.
- Start the move with no weight in your hands. Progress to a light weight slowly. Both arms overhead is equally as hard as adding a weight, so be sure to use this option when your core has strengthened and is ready for more challenge.
6. STANDING TWISTS/ROTATIONS TO 10:00 AND 2:00.
TARGETS: All abdominal muscles, gluteals, quads, inner thighs, hamstrings, shoulders and arms.
SETUP: Stand tall with feet about 2-3 feet apart. Bend your knees into a plié. Squeeze your glutes and inner thighs to anchor and brace your lower body. Pull your shoulder blades together, pulling your shoulders back. Lift your chest tall, but do not flare out the ribcage. Pull your abdominals in very tight.
MOVE: Keeping your lower body braced and anchored; begin to twist your upper body side to side. If you were standing on the face of a clock in the middle, your torso would rotate to face the 10:00 mark and the 2:00 mark. Put your hands on your shoulders or your head with your elbows shoulder height as you twist. Keep your elbows back, not letting them drift toward the front. All the movement is from the waist and up. Do not let your hips move.
FOCUS: Keep your spine tall and lifted so as you twist you have the vertebrae as lifted from the discs as possible, avoiding compression of the discs. Additionally, it is important to not arch or slump to avoid compression of the discs. Your Postural Points are important guidelines.
COMMENTS: This exercise is done without weights. If you progress and keep the exercise slow and very controlled, light weights can be added after you are stronger. If you add any speed to the exercise, it is safer to avoid using any weights. If you add speed, make the exercise smaller and continue to be under control. The lower you drop the hips, the harder the exercise becomes. Keep your hips very quiet throughout the exercise.
Your hips can go as low as a ninety-degree bend of the knee, which will bring the hips down to about knee level. At this depth, make sure that your feet are wide enough apart that your knees are over your ankles, not jutting over your toes.
SAFETY AND FORM POINTS:
- Pay close attention to your posture. Keep your shoulders back, your chest lifted, your back in neutral spine not arching or slumping.
- For more intensity in the legs, you can drop your hips until they are almost as low as your knees. If you go this low, make sure that your feet are wide enough that your knees are over your ankles, not jutting over your toes.
- Twist only as far as you can without moving your lower body. 10:00 and 2:00 are guidelines. If you have to swing your torso with momentum to get to 10:00 and 2:00, then make the movement smaller and stay under control.
7. CRUNCHES IN TABLETOP—STRAIGHT AND SWIVEL
TARGETS: All abdominal muscles (rectus, obliques, transverse)
SETUP: Lie on your back, knees over hips, feet as high as knees.
MOVE: Lift your shoulders by sliding the lowest ribs down toward the top of your pelvis. Finish the move by giving the ribs one last little squeeze down toward the pelvis in that position. As you go down, do not just release the ribs, but feel them slide back toward their original position. Do this with control.
After 30 seconds of this move, add the obliques by moving side to side. Keep your left hand behind your head and as you go up into the move, reach your right hand toward your right ankle, swiveling your knees toward the left. You should be able to see both feet on the right when you swivel. Repeat the move alternating right and left sides for 30 seconds.
FOCUS: When you swivel, the action of the move is centered on the right hip and the lowest part of the right rib cage, then the left hip and the left rib cage. Feel the hip and ribs pull together. The more you swivel the feet, the more you should feel the obliques. Try not to move your knees into a tuck, but stay in tabletop.
COMMENTS: If the move is too hard, let your knees come slightly toward your chest. The more you tuck your knees toward your chest, the easier the move. If you want more intensity, move the knees a little further away from your torso (away from being in a tuck). As your knees move away from the center of your body, as the move gets harder, be very aware of your spine arching off the ground. Keep the low back braced down toward the floor. As you go down under control, the spine should not bow off the floor, nor should the ribs flare out. If either of these things happens, then bring the intensity back down to an easier version of the move.
SAFETY AND FORM POINTS:
- Use your hands to support your head. Do not pull on your head, creating stress in your neck.
- When you swivel, look for your feet. It helps to keep your feet together and swivel the feet and knees as one unit. Feel your ribs slide down right on top of the hips on the side you are working.
- If your back arches up when you drop your shoulders down, try a little easier position. Bring your knees a little closer to your chest. As you get stronger, move the knees back out to tabletop position.
- For variety, you could do 15-30 seconds of tabletop swivels on one side, then repeat on the other side, rather than alternating side to side.
8. KAYAKING
TARGETS: Abdominals, quadriceps and hip flexors.
SETUP: Sit upright with your knees bent, feet on the floor. Lift your feet off the floor, balancing on your sacrum, tucking your knees into your chest. Keep your chest lifted. If you are a beginner, this may be all you will want to practice for starters.
MOVE: Place your hands on the floor by your hips. If you can keep your back straight and your chest lifted, then start to drop your knees side to side. If you can do this holding form, then try lifting your hands off the floor and move the arms in opposition of the legs—as the knees and legs drop to the right, your hands and elbows will aim at your left hip.
Alternate this move side to side for one minute. If you start to slump (your chest drops, your ribs sink down, your back rounds) then stop the move and rest.
FOCUS: Keep your spine straight. If you do this move with a slumped spine, then the body will be rotating and compressing your spinal discs. Check your Postural Points. Keep your chest lifted. If you grab your shins and can lift your chest back up, then you slumped and lost form. Be aware of this form-break and avoid it.
COMMENTS: Keep your chest lifted and your back straight. Do not let your chest or ribs sink. When your spinal muscles and core are very strong, this move can also be done holding a very light weight. Try this option after you can perform this move for a minute without breaking form.
SAFETY AND FORM POINTS:
- Keep your chest lifted and your spine straight. Do not slump.
- Start the progression with your hands on the floor. As you get stronger, try moving side to side with your hands moving hip to hip.
- Try alternating speeds. Do some very slowly, exploring the move, and some faster controlling momentum.
9. DOUBLE LEG STRETCH
TARGETS: Abdominals, quadriceps and hip flexors, gluteals, shoulders and arms.
SETUP: Lie on your back with your knees tucked into your chest, head and shoulders up off the floor, hands reaching beyond your feet. Even though your spine is flexed, try not to shrug your shoulders forward. Nor should you let your shoulders creep up—keep the shoulders down, lengthening your neck. Pull the belly button toward your spine.
MOVE: As you inhale drive your legs out away from your center and reach your arms overhead, keeping your shoulders and head up. If you drive your legs out too low, your back might arch up or your ribs might flare out—it is important to funnel the ribs down and keep the low back pressing toward the floor. Exhale as your return to your tuck position. Repeat for one minute.
FOCUS: Your low back should not arch off the floor when you open out of the tuck. Keep your rib cage pressed down toward the top of your pelvis throughout the exercise. If your ribs slide away from your pelvis, allowing your back to arch, then the move was opened up too much. Keep your navel pressed down toward your spine throughout the exercise.
COMMENTS: Beginners will tuck, and when they open up, their feet will end up right over the hips and the hands will be right over the shoulders. As you get stronger, this move will open more. Your ribs need to stay pressed down; your low back should never arch up. Your head, shoulders and shoulder blades are up off the floor in both phases of the exercise—in the tuck and when you open out. Work up to doing a minute without breaking form.
SAFETY AND FORM POINTS:
- Your ribs stay pressed down toward the top of your pelvis, activating the abdominals during the whole phase of the exercise. When you are in the tuck, you should have your ribs pulled down, and when you open up, your ribs are still pulled down. If your shoulders or shoulder blades drop during the exercise, except if you are resting, consider that a form break.
- If your back arches up during the exercise, you have broken form and need to pull the intensity down. Do this by keeping the arms and legs closer over your body—do not open out so far.
- Keep your chest open. Do not let your shoulders shrug forward.
- Keep your shoulders down and away from your ears. Press the shoulder blades down deep in the back to keep the neck long.
- Pull the belly button toward the spine throughout the exercise.
10. HYPEREXTENSIONS/HOUSE FOR A MOUSE
TARGETS: Transverse abdominus, gluteals, low back, quadriceps, upper back.
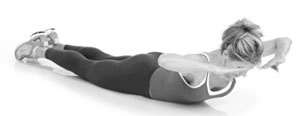
SETUP: Lie on the floor prone—belly down. Feel your ribcage on the floor and your pubic bone on the floor. Keeping the ribs and pubic bone on the floor, attempt to lift the belly button off the floor. It may not go up very far at first, but keep trying.
Another way to try this exercise is to move into it from a hyperextension. Start lying prone with your hands on the floor by your shoulders. Lift your body up just enough so that you have your legs on the floor, pubic bone on the floor, but the rest of the torso is hovering off the floor. Suck the navel toward the spine hard and start to lower your body down.
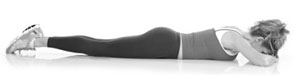
Try and have the next thing that touches the floor be your RIBS, not your belly button area—while keeping your pubic bone on the floor. Do not let your pubic bone lift up off the floor at all. This might be a foreign move for you. It’s called a “House for a Mouse.” You are trying to lie on the floor, face down, with your abs activated leaving a little space at the belly button for a “mouse.”
MOVE: Keep your “House for a Mouse” and lift your upper body off the floor for 8-12 repetitions. You will not be able to lift very high, unless you break form. Do 8-12 repetitions lifting only your legs off the floor—keep the pubic bone anchored to the floor, the ribs touching the floor, and the navel up off the floor—or at least trying to lift in that direction. Finish with 30 seconds of both upper and lower body lifting together, always trying to keep the “House for a Mouse.”
FOCUS: This move is to teach you how to activate the transverse abdominus. The floor will give you biofeedback if you are doing it correctly. For some people the pattern is so foreign, it might take a few tries before your body understands it.
COMMENTS: If you end up balancing on your abs, distending them, you will end up lifting your upper and/or lower body quite high. Your rib cage will probably slide open, making it very likely that your low back will feel compression. Additionally arm positioning intensifies this exercise. The easiest version is to have your hands on the floor near your shoulders. If you lift your hands off the floor it gets harder. Moving your hands further out—near your forehead—makes the move harder. Stretching your arms overhead makes the move harder.
SAFETY AND FORM POINTS:
- Your pubic bone and lower ribs are your anchors. Your body will rest on these bones, while the muscle in between these bone (the transverse abdominus) activates, pulling the navel toward the spine (away from the floor).
- Do not rest on your abs while lifting your body. Pull the navel up and in, away from the floor.
- If you pull the abs away from the floor properly, you will not lift your body very high.
- As you get stronger move the arms further overhead.
- When you lift your legs off the floor, keep the pubic bone down, and stretch the legs straight and long. Squeeze your glutes and your quads. This will make your hipline very straight and your knees very straight. It also should help you to anchor the pubic bone down into the floor.
Stretch
1. CAT/DOG
TARGETS: Low back, abdominals, mid back, chest

SETUP: On hands and knees, hips over knees, and shoulders over wrists.
MOVE: Pull the navel toward the spine, knitting the ribs as close together as possible, feeling the stretch in the low back. Press the sternum (breast bone) up too, which will create a stretch in the upper/mid back as well. After doing this move (flexion of the spine), extend the spine by lifting the chest, lifting the tailbone, feeling the back arch into extension. Do not sag into the position, but use your muscles to press into it. Listen to your body. Go to the point of a gentle tug without over-stretching. Hold each stretch about 20-30 seconds. You can also repeat going between these two stretches two or three times holding each stretch 8-10 seconds, if you prefer.

FOCUS: Work on feeling a full range of motion of your spine through flexion and extension.
COMMENTS: When you are flexed/arched in the cat stretch, for variety try shrugging the right shoulder up a little to feel more stretch on the right side of your spine (all the way down to the right side of the sacrum, the base of the spine), then repeat on the left side. Using that position, one can also add a latissimus dorsi stretch by reaching the right arm across the body toward the left. In this option you will feel the intensity on the right side over the lats.
SAFETY POINTS:
- Stay within the range of motion that feels comfortable for your body. Do not over-stretch.
- If either of these stretches bothers your low back, try shortening the range of motion.
2. BRIDGE
TARGETS: Chest, abdominals, thighs, shoulders, neck.
 SETUP: Lie on your back with your knees bent. Pull your feet in until they are directly under your knees. Have your hands by your sides next to your hips.
MOVE: Inhale, expanding your ribs. As you exhale, begin knitting the ribs together, pressing your low back into the floor. As you do, tilt the tailbone off the floor and start to lift your vertebrae off the floor one by one from the tailbone upward, until you are up on your shoulder blades. Bring your arms underneath you, lacing your fingers together.
Rock from side to side a little to reach your hands down further toward your feet, opening the neck and shoulders. Hold the stretch for about 20-30 seconds.
FOCUS: While you hold the stretch, continue to press your feet down into the floor, keeping your hips lifted. Be aware of the rib cage flaring open. Keep the ribs knit together as you press up through the hips, tilting the pelvis. Look for the stretch over the quads as you work through the pose.
COMMENTS: If you feel any compression in your low back, you may be arching your back. Check that your ribs have not flared open, but are knit shut. Try and make it feel like your low back is aiming toward the floor, and in opposition, the glutes are lifting your hips.
SAFETY POINTS:
- Keep the ribs knit together, do not let the ribs pop open.
- Keep your feet and knees in parallel. For variety you could point the feet and knees open, but this should not be the primary way of performing Bridge.
- When you draw the hands under you, with your fingers laced together, open the chest and make the neck feel very long.
3. SPINAL TWIST
TARGETS: Low back, hip, rib cage, shoulders and arms.
SETUP: Lie on your back with your knees bent and feet underneath knees. Stretch your arms to the side at shoulder height. Check that your shoulders are not shrugged up toward your ears, but are pressed down. Rotate your arms so that your palms are up.
MOVE: Move your knees toward your right side, stacking your knees one on top of the other. Keep both shoulder blades down. Your head and neck will be in alignment with your shoulders, facing up. Hold the stretch for 20-30 seconds releasing your low back. To exit the move, draw your knee back up to your chest, let your other leg follow. Give yourself a full breath or two before beginning the stretch on the other side.
FOCUS: As you hold the stretch, use your exhalation to sink down into the stretch, going deeper. Work on keeping your shoulders and shoulder blades flat on the floor.
COMMENTS: Some options to this stretch include tucking your top knee higher, overlapping your bottom knee. You could further encourage this stretch by placing your hand on the top knee, gently pressing it toward the floor. Rather than overlapping the top knee you could also choose to straighten out the top leg and either move it higher up on the floor, or further away from your body, stretching through the hip.
SAFETY POINTS:
- Always stay within a comfortable range of motion. You should feel a gentle tug. Avoid over-stretching.
- If you notice that one side is tighter than the other, stretch both sides, but stretch the tighter side either longer, or go over that side a second time.
- Keep your shoulders, neck, and upper body muscles quiet and relaxed during this stretch.
4. HAMSTRING STRADDLE
TARGETS: Hamstrings (back of the thigh) on the medial side, and inner thigh.
SETUP: Sit on the floor with your feet in front of you. Move your feet into the widest “V” that you can comfortably make. Sit very tall—do not slump your spine forward.
MOVE: Keeping your spine tall and chest lifted, start to lean forward until you feel a tug in the back of the thighs, in your hamstrings. Do not slump your spine or shoulders forward. Keep your back straight. If you have very tight hamstrings and have difficulty sitting tall, put your hands behind your hips and staying tall and lifted, push yourself forward until you feel the stretch. If you are more flexible, place your hands in front of your hips to support yourself as you go forward. Hold the stretch for 20-30 seconds.
FOCUS: If you keep your feet in neutral or pointed, you will feel the intensity of the stretch in your hamstrings. If you flex your feet, pulling the toes back toward your shins, you will feel most of the intensity of the stretch in your calves. It is good to incorporate both options.
COMMENTS: If you feel any discomfort in your low back ease off the stretch and check, your posture. Keep your chest lifted. Do not collapse your back, slumping into the stretch.
SAFETY POINTS:
- Keep your chest up. Do not slump your spine while stretching
- Stretch to the point of a mild pull. Do not over-stretch.
- If you cannot sit up straight before starting the stretch, put your hands behind your hips to help you sit up more upright, rather than having your hands on the floor in front of you.
5. HAMSTRING “X” STRETCH
TARGETS: Hamstrings (back of the thigh) on the lateral side.
SETUP: Sit tall with your feet stretched out in front of you. Keep your right leg on the floor and drape the left leg on top of the right with the knee and calf crossing (not crossing at the thigh). The right leg is the leg that will get the stretch.
MOVE: Sitting as tall as you can, lean forward from the hip (do not round your back). Your legs formed an “X” when they crossed. Aim your hands between your feet over the “X”. You should feel the outside part of your right leg stretching. You may also feel a stretch on the outside (lateral side) of your right calf. Stretch the right side for 20-30 seconds, and then repeat on the left side with the left leg underneath the right leg for 20-30 seconds.
FOCUS: Use your breath as you stretch. Deepen the stretch as you exhale,
COMMENTS: This lateral side of the hamstring tends to be stretched seldom and can be very tight. It may take a while for the muscles to ease up from this tightness. Be patient. The stretch can also be done with a flexed foot. The intensity will be on the outside part of your calf.
SAFETY POINTS:
- Stay tall through your spine when stretching hamstrings. Do not round your spine.
- Do not cross your legs tightly. Simply drape the top leg on top of the bottom leg.
- Make sure that you sit up tall. When your spine rounds, the hamstrings can escape the stretch. Try an experiment: Sit tall, lean forward, feel the stretch. Now holding that position, collapse your spine and slump. Most or all of the stretch will disappear from your hamstrings, and the stretch will move into your low back. This might seem like a good substitution, but the low back is getting a stretch with a collapsed spine, which increases compression of the discs.
Cardio Moves
1. JOG IN PLACE
As you jog, be aware of how your feet strike the floor. You should feel fluid through the feet. The ball of the foot will strike first when jogging in place, and then your heels should drop to the floor in the gait (not stay rigidly up on your toes). After 30 seconds lift your knees high and add “Mountain Climber” arms (arms go very high with the cadence of the feet. Use the same arm as foot that strikes the floor).
2. CROSS COUNTRY SKIING
Land on both feet simultaneously, but have one foot forward and the other backward. As you land, sink into your legs feeling the shock absorption of the knees and hips. This move can be done slowly with the emphasis on shock absorption, or quickly rebounding from right lead to left lead.
3A. ALTERNATING KNEE REPEATER OPPOSITE KNEE CHOP WITH TWIST RIGHT
Bring your right knee toward your chest on the left side of your body. As you do, your arms will chop to the knee, meeting it. Add a little twist by letting your arms go to the outside of the right knee.
To get more intensity from the move, put your weight into your left heel so that you can drop your hips lower, but not have the left knee jut forward. If you brace the left heel well, you will be able to get the hips low enough that the glutes and hamstrings will also fire (if you are standing more upright, you may feel this only in the quads). Rapidly pull the knee in and out, chopping with the arms for one minute.
3B. ALTERNATING KNEE REPEATER OPPOSITE KNEE CHOP WITH TWIST LEFT
Repeat the above exercise pulling the left knee toward the right side of your chest for one minute.
4. SIDE TO SIDE TAP BEHIND WITH LEAP
The basic move here is a Side to Side or Step Touch. Step to the right, tap the floor with your left foot, then step to the left, and tap the floor with your right foot. Move the intensity up by tapping the foot behind the stepping foot. Try and cross your inner thighs as you bring it behind, not just cross your foot behind. Add a leap to the move for more intensity and propulsion. Tap back for 30 seconds and then leap for the final 30 seconds. Try and build up to a full minute of leaping this move.
5. BOXER SHUFFLE WITH THE CLOCK
Imagine you are standing on a clock at 12 NOON. A boxer shuffle is a bouncy move shifting your weight from right foot to left foot. If you are having trouble figuring it out, try jogging in place, slowly making your feet closer and closer to the floor. Widen your feet as you do this small jog and you should end up in a boxer shuffle. For 30 seconds leading with the right leg, take the right foot to 1:00, 2:00, 3:00, 4:00, and 5:00 moving back up and down the clock. The next 30 seconds lead with your left and go from 11:00 to 10:00 etc., moving back up the clock.
7. POWER DOWNS/STEP TOUCH WITH A STICK
Starting on both feet, laterally leap to the right landing on your right foot absorbing your body weight with your hips and knees. Step back to the left and repeat the leap to the right. As you do the move, twist your torso to the right, reaching out with your arms, sticking the move. Do for 30 seconds leaping right, and then repeat the move to the left for 30 seconds.
8. STEP TOUCH HAM CURL
Step to the right and lift your left foot up toward your glute, then step to the left, lifting the right foot toward the glute. As you lift your foot, pull your elbows toward your waist, squeezing your shoulder blades together—your arms will be a little bit behind you. Keep the chest up and up. Do the move for one minute. Advanced exercisers can add some propulsion—leaping from side to side with a soft landing, or make the move bouncy.
9. HIP HIKES
Balancing on your right leg, lift your left knee toward your left armpit. As your knee goes up, your left elbow and arm will chop down to meet it. Try hiking your left hip as you repeat the move rapidly—bringing the left ribs close to the left hip. Do for 30 seconds then switch to the other side for 30 seconds.
10. JUMP ROPING
This move can be done with or without a jump rope. If you do not have a jump rope, mimic the jump rope move with either a small hop, a small jog, or by “skipping”. Other variations include using your feet in a cross country fashion: one in front of the other as you jump from foot to foot, or double jumps: jumping 2 narrow, 2 wide, or one foot at a time.
To view the original article click here.
To reprint this article, visit the source website for reprinting guidelines